fbpx
Garment Steamer Blog

Garment Steamer | A Must-Have in Wedding Season

A Garment Steamer is the foremost option for hassle-free ironing. When it comes to delicate clothing or items that are too large to fit on an ironing board, a garment steamer is the ideal small appliance for swiftly and conveniently removing creases. To remove wrinkles from clothing, a garment steamer employs steam. It is simple to use and does not need any additional tools, unlike an iron which needs an iron stand or a flat solid surface with a piece of cloth. You can quickly and simply eliminate wrinkles from your clothes with a garment steamer without causing any hassle. In this blog, we will discuss a lot about the garment steamer. Keep reading, if you want to know about how to select the best model for yourself and how to use it. 

How to Pick the Best Garment Steamer Based on Your Needs?

You might have looking for an opportunity to upgrade your ironing tools or prepare for an upcoming wedding. In order to choose the finest garment steamer for your purposes, you must take into account a number of things to make sure you purchase the proper one. Here, step-by-step instructions are given to assist you in reaching a decision:

  1. Jot Down Your Needs

First of all, think about how frequently you’ll use the clothing steamer. Is it for routine usage, occasional touch-ups, or particular clothing? Take into account the fabrics you plan to steam. Make sure it’s adaptable enough for your wardrobe because different steamers work best with different types of textiles.

  1. Garment Steamer Types

There are two types of garment steamers available in the market. Portable handheld steamers are great for fast touch-ups and traveling. Larger, more potent standing steamers are ideal for heavy-duty steaming and diverse clothing care.

  1. Output and Power of Steam

 In general, steamers with higher wattages function better. To effectively remove wrinkles, look for a garment steamer with a high enough steam flow rate and wattage.

  1. Heat-Up Period

Faster heat-up times are useful, especially when you have a limited time. Find such garment steamer models that can heat up quickly—typically in a matter of minutes.

  1. Size of the Water Tank

Think about the water tank’s size. Longer continuous steaming without regular refilling is possible with a bigger tank.

  1. Steam Options

Choose a steamer that comes with manual or digital steam settings. For best results, various textiles can need varying amounts of steam.

  1. Accessories & Attachments 

For varied clothing cleaning, see whether the steamer includes handy accessories like brush heads, crease tools, or hangers.

  1. Dimensions and Portability

Think about mobility and storage. Make sure the steamer is simple to store and transfer if necessary. Getting well-pressed, wrinkle-free clothing requires proper steam iron use. 

After buying a garment steamer, some people have difficulty operating it. Mostly, people use such steamers wrongly. For your ease, we will discuss using a garment steamer.

Prior to Starting 

Read the Manual 

Read over the manufacturer’s instructions and safety precautions in the user handbook that is included with your steam iron.

Assemble Your Materials

The clothes you wish to iron, a clean ironing board, and a steam iron are all required.

To prevent mineral accumulation in the steam vents of the iron, fill the water reservoir with distilled or demineralized water.

Preparing the Iron

Set the Iron on a Surface That Is Heat-Resistant

The iron should be plugged in and set down on a heat-resistant surface, such as an ironing board.

Choose the Proper Temperature

Based on the fabric of the clothing you’re ironing, adjust the iron’s temperature dial. Most irons feature temperature options for several types of cloth, including cotton, linen, silk, and wool.

For fragile fabrics, start with a lower temperature setting, and for heavier fabrics, raise it gradually.

Prepare the garment by Ironing

Make sure the clothing is dry and clean. The part you wish to iron should be facing up.

Steam Options

Verify the steam control setting on your iron. You might want to modify the steam amount depending on the cloth. For difficult creases, some irons offer a blast of steam setting.

Sectioned Iron

Start with a single area of the garment, such as the collar or cuffs. To eliminate wrinkles from the cloth, hold the iron over it, push the steam button to release steam, and then press the iron down onto the fabric. Following the fabric’s grain, move the iron in straight, equal strokes.

Don’t push too firmly since this might harm the cloth.

Replicate this for the Whole Garment 

Section by section, work your way through the garment, paying close attention to seams and challenging spots. Use the iron’s edge to make clean lines for pleats and wrinkles. Once the entire cloth has been ironed, hang it up or fold it right away to avoid the creation of new creases.

After Ironing 

Unplug and empty water after ironing:

– Switch off the iron and remove the plug from the outlet.

– To avoid mineral formation, drain any residual water from the water reservoir.

Maintenance and Cleaning

Before cleaning, let the iron cool fully. To get rid of any leftovers, you may clean the soleplate with a moist towel. You might need to routinely clean the steam vents and the anti-calc system, depending on the care recommendations for your iron.

Storage

To prevent damage, store the iron upright and properly wrap the cord. This will help your garment steamer to be prolonged for a lifetime. 

Finding the best garment steamer isn’t that easy. However, Electro Gallery brings you the finest collections of garment steamers at highly affordable rates for you. Get wrinkle-free clothes that will add grace to your personality. 

Contact us to learn more about your desired product now. 

Refrigerator Blog

Refrigerator Organization Hacks for a Clutter-Free Fridge | Electro Gallery

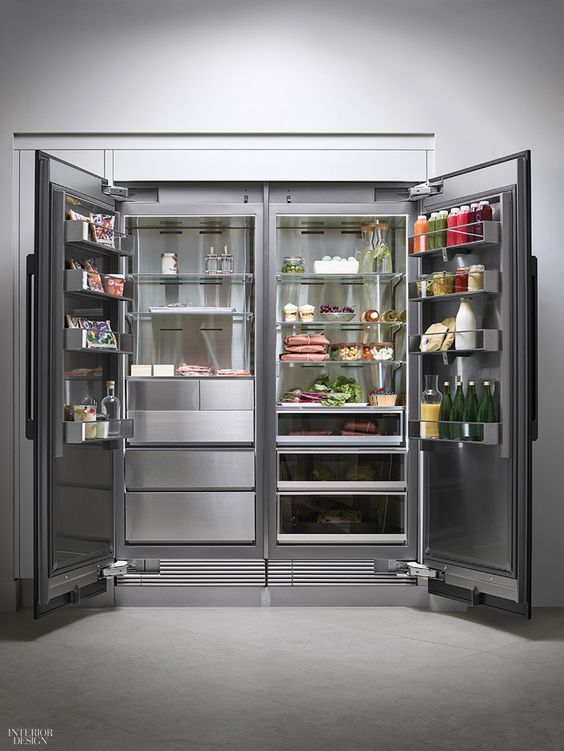
Refrigerators might be one of the most neglected home appliances. However, you practice adjusting your food and groceries in it more every day or two or three times a day. The refrigerator must have those sauces and things that haven’t been used in months. Although, your fridge has a lot of potential to become a mess quickly.

But once you make up your mind to discard them and get success by doing this, the next thing is to make your fridge again and reduce food waste.

What if you don’t know that you can organize your fridge in a better way while using all the right spaces correctly use the food before expiration days and save lots of money. All you need is some useful organization hacks that can prevent your fridge from being overstuffed without using any extra tools. 

In this blog, we will discuss a few starting points for your fridge that will help you organize your fridge professionally by making just a few changes. 

Your Fridge Drawer 

One of the most underrated spaces in your fridge is the drawer which is actually versatile. Use this space for delicate food such as fruits like berries, and vegetables like leafy greens and herbs. This portion can also be utilized as a snack zone such as cheese, yogurt cups, and other healthy snacks that you need your kids should grab when hungry. Moreover, this area can be filled with beverages for better arrangement and temperature. Meat and seafood can also be placed to prevent all kinds of cross-contamination.
Must-haves: The most common mistake we make is to overfill this container. As a result, the airflow is affected and the temperature becomes inconsistent. Similarly, adjust the temperature settings according to the food type. Moreover, people oversight the cleaning schedule of this area which helps build up the crumbs, residue, and spills. Clean it with the water and vinegar solution. 

Drink Dispenser 

Drink dispensers are ideal for iced tea, soda, water juice, and such beverages. It is better to let them stand tall in a few rows and columns. Use labeling the containers for better identification. Regularly refill them to minimize the hassle and keep them on a prominent level. The best thing is to talk about this dispenser with the family and encourage them to follow instructions. 

Must-haves: Regularly check the empty containers and shuffle them according to the expiration date. Also, check the expiration date of the containers and discard what is already expired to avoid clutter. 

Herb Saver Pod

Herbs are something that is part of your daily food intake. Your fridge might have such containers. Label them with the names to avoid mess. Better to use transparent pods. You can also use a damp cloth or a paper towel to keep the moisture consistent. Shift all your herbs to the herb crisper drawer with a high humidity level.
Must-haves: Regularly clean and refill the herbs. Also, educate your family members about it.

Shelf Liners

For a better clean and organized environment, use shelf liners. Vinyl or silicon liners of different colors are best to identify the section. Color codes will help to identify what is fresh and what is left. You can cut them in different shapes to use them as an additional accessory for your fridge. 

Must-haves: Do not oversight the regular cleanliness and maintenance. Remove and clean the stains, odors, and spills. Moreover, avoid overloading the shelf with extra and heavy items. 

ca71b083cb1bf619e847f3ca7a63edf0

Mason Jars 

Mason jars are the best yet versatile option for your fridge. They are stackable storage for pickles, chatnis, pastes, soups, and other types of thick liquid. You can label them for better identification and use transparent jars to avoid unnecessary mess.
Must-haves: Keep separate spoons inside the jars and clean the outer part often. Also, educate your family members about jar usage. 

Glass Storage Contains 

Glass storage containers are better for leftovers and food preparation for the week ahead. It prevents the food inside the containers. Label them and keep track of freshness and confusion. To maximize space and maintain an organized appearance, use matching sets in varied sizes. Avoid overfilling, keep lids spotless, and stack or nest containers when not in use.

Must-haves: Keep containers clean on a regular basis to avoid spills and odors, and make sure everyone in your household is familiar with the system of organization. These techniques assist in enhancing fridge organization while avoiding frequent errors.

Basewax Covers

Refrigerator beeswax covers can help prevent food spoilage and save plastic waste. Use them to cover platters, bowls, and partially consumed fruits and vegetables. They are not designed for high temperatures, so stay away from using them for hot or raw meat. The label wraps with contents and dates making it simple to track freshness.

Must-haves: To prevent errors and keep a more organized fridge, don’t forget to clean and dry them before reuse and instruct family members on how to use them properly.

Reusable Storage Bag 

Choose a sustainable method of food storage in reusable storage bags in the refrigerator. Use them to preserve fruits, veggies, snacks, and even meat for marinating. For simple identification, mark the contents and the date on the bags.
Must-haves: Always make sure they are firmly sealed to avoid spills or odors. Utilize caution while using them with hot meals or liquids that might leak. Wash and air dry your bags after each use to keep them clean, and teach your family members how to use them properly to reduce mistakes and improve fridge organization.

Your refrigerator will become the epitome of freshness and organization if you use these amazing refrigeration organization tips. You can choose any of the above methods for better arrangements and maintenance of your refrigerator. Eventually, you’ll not only save time and reduce food waste but also have a fridge that looks good enough to post on Instagram. Prepare to up your fridge organization game and enjoy the advantages of a carefully planned and useful area.
Are you looking for a refrigerator for your routine use? Electro Gallery carries the largest range of the highest quality, most modern, and stunning refrigerators. Contact us to know more about the best one for yourself.